How does syringe pump programming and operation work, especially in laboratory or clinical settings?

Syringe pump programming and operation in laboratory or clinical settings involve the setup and control of the pump to accurately and precisely deliver fluids.

Here’s how it typically works:

Programming the Syringe Pump:

  1. Selecting the Syringe Size: Start by selecting the appropriate syringe size that matches the volume of the fluid you want to deliver. Syringe pumps are compatible with a range of syringe sizes.
  2. Setting the Flow Rate: Specify the desired flow rate at which you want the fluid to be delivered. This is typically in units like milliliters per hour (mL/hr) or microliters per minute (µL/min).
  3. Selecting the Infusion Mode: Depending on the pump model, you can choose from different infusion modes. Common modes include continuous infusion or intermittent bolus infusion.
  4. Configuring the Target Volume or Time: You can set the target volume (the total amount of fluid to be delivered) or the duration (the time it should take to deliver a specific volume). Some pumps allow you to specify both.
  5. Additional Settings: Some advanced syringe pumps may have additional settings, such as setting a specific start time or setting up infusion profiles with changing flow rates over time.

Operating the Syringe Pump:

  1. Loading the Syringe: Place the syringe with the fluid to be delivered into the syringe pump. Make sure it’s securely and correctly positioned.
  2. Calibration: Some syringe pumps require calibration to ensure accurate delivery. This may involve moving the plunger to a reference point to determine the syringe’s volume or using the pump’s calibration feature.
  3. Starting the Pump: Initiate the pump by pressing the “start” or “run” button on the device’s interface. Syringe Pumps suppliers In some models, you may need to confirm the settings or enter a security code.
  4. Monitoring: Continuously monitor the syringe pump during operation. The display typically shows real-time information, including the current flow rate, volume delivered, and any alarms or warnings.
  5. Alarms and Alerts: Syringe pumps are equipped with safety features to detect issues such as occlusions, air bubbles, or empty syringes. If an issue is detected, the pump will generate an alarm or alert for the operator to address.
  6. Stopping the Pump: When the pump reaches the programmed target volume or time, or if any issues arise, you can stop the pump manually.
  7. Recording Data: It’s common practice in laboratory and clinical settings to record the data related to the infusion, such as the start and end times, the actual volume delivered, and any issues encountered.
  8. Disposing of Syringes: Safely dispose of used syringes and any medical waste in accordance with established protocols.

The operation and programming of syringe pumps may vary slightly depending on the specific model and manufacturer. It’s important to follow the manufacturer’s instructions and ensure that operators are trained in using the syringe pump to avoid errors and ensure patient safety in clinical settings or accurate data collection in laboratory settings.

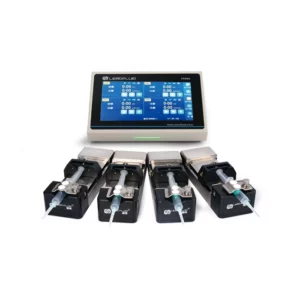
What are the key components of a typical syringe pump system?

A typical syringe pump system consists of several key components designed to accurately and precisely deliver fluids.

These components work together to control the syringe and the flow of the fluid. Here are the key components:

  1. Syringe: The syringe is a crucial component, as it holds the fluid to be delivered. Syringe pumps are compatible with a variety of syringe sizes, and the choice of syringe depends on the required volume and application.
  2. Syringe Holder or Clamp: This component holds the syringe securely in place, preventing any movement or dislodging during operation. It ensures that the plunger of the syringe is appropriately positioned.
  3. Drive Mechanism: The drive mechanism is responsible for the precise movement of the syringe plunger. It can be a stepper motor or another type of actuator that pushes or pulls the syringe plunger at the programmed rate.
  4. Infusion Tubing: Infusion tubing connects the syringe to the patient or experimental setup. It provides a conduit for the fluid to flow from the syringe to the target location. The tubing is typically made of materials compatible with the fluid being delivered.
  5. Control Interface: The control interface allows the operator to program the syringe pump and monitor its operation. This interface can be a physical control panel with buttons and a display or a digital interface via a computer or touchscreen.
  6. Flow Rate Control: Syringe pumps enable precise control of the flow rate at which the fluid is delivered. This control can be adjusted through the interface, and the pump will maintain the programmed flow rate throughout the operation.
  7. Volume or Time Setting: Operators can program the desired target volume or time for the infusion. The syringe pump will continue operation until it reaches the programmed endpoint.
  8. Safety Features: Syringe pumps are equipped with safety features to detect issues like occlusions, air bubbles, or empty syringes. These features may include pressure sensors, air detection sensors, and alarms to alert the operator.
  9. Power Supply: Syringe pumps are powered by electricity, either through a direct electrical connection or via a rechargeable or replaceable battery. Reliable power sources are essential to ensure continuous and accurate fluid delivery.
  10. Data Logging and Connectivity: Some syringe pumps have the capability to log data related to the infusion, such as flow rates, volumes delivered, and any alarms or alerts. They may also have connectivity options, such as USB ports or Ethernet, to facilitate data transfer and remote control.
  11. Mounting Options: Syringe pumps may come with mounting options for attaching them to a stand, IV pole, or other support structures. This helps stabilize the pump during operation.
  12. Software or Programming Capabilities: In clinical or laboratory settings, syringe pumps may be compatible with software that allows for remote control, data logging, and complex programming, especially in research applications.

The exact configuration of a syringe pump system may vary depending on the manufacturer and model. These components work together to provide accurate and controlled delivery of fluids in medical, research, and industrial applications.

What are the common uses and applications for nonwoven tote bags?

Nonwoven tote bags have a wide range of uses and applications due to their versatility, durability, and eco-friendly nature.

Here are some common uses and applications for nonwoven tote bags:

Grocery Shopping: Nonwoven tote bags are frequently used as reusable shopping bags, allowing individuals to reduce their reliance on single-use plastic bags. They provide a convenient and eco-friendly alternative for carrying groceries and other items.

Retail and Promotional Events: Nonwoven tote bags are popular in the retail industry as promotional or branded bags. They can be customized with logos, slogans, or designs, making them an effective marketing tool for businesses. These bags are often given away at trade shows, conferences, or promotional events.

Personal Carry-All: Nonwoven tote bags can serve as versatile carry-all bags for everyday use. They are ideal for carrying books, laptops, gym clothes, picnic supplies, or other personal belongings. The spacious design and sturdy handles make them convenient for various activities.

Beach and Travel Bags: Due to their lightweight and durable nature, nonwoven tote bags are commonly used as beach bags or travel bags. They can hold towels, sunscreen, snacks, and other essentials for a day at the beach or serve as a carry-on bag for travel purposes.

Gift Bags: Nonwoven tote bags are an eco-friendly alternative to traditional gift bags. They can be reused by the recipient for shopping or other purposes, adding value to the gift. Nonwoven tote bags can be personalized or decorated to suit different occasions and celebrations.

Farmers’ Markets and Produce Bags: Nonwoven tote bags are well-suited for farmers’ markets or as produce bags. They can hold fresh fruits, vegetables, and other perishable goods. The breathable fabric of nonwoven bags allows air circulation, keeping the produce fresh for a longer time.

Charity and Fundraising Events: Nonwoven tote bags are often used for charity events or fundraising campaigns. They can be sold as merchandise to raise funds for a cause or used as giveaway items to promote awareness or support for a particular organization or event.

Craft and DIY Projects: Nonwoven tote bags are also popular for craft and do-it-yourself (DIY) projects. They can be decorated, painted, or embellished with fabric markers, patches, or embroidery. Nonwoven bags provide a blank canvas for creative expression.

These are just a few examples of the common uses and applications for nonwoven tote bags. china nonwoven tote bag manufacturer Their versatility makes them suitable for a wide range of purposes, and they continue to gain popularity as a sustainable and practical alternative to single-use bags.

How durable are nonwoven tote bags, and what weight or thickness options are typically available?

The durability of nonwoven tote bags can vary depending on the specific manufacturing processes and materials used. However, nonwoven tote bags are generally known for their strength and resilience.

Here’s an overview of their durability and the typical weight or thickness options available:

Durability: Nonwoven tote bags are designed to withstand regular use and carry moderate to heavy loads. They are often made from synthetic fibers such as polypropylene (PP) or polyester (PET), which provide strength and resistance to tearing or stretching. The stitching, handles, and seams are also reinforced to enhance durability.

Weight Options: Nonwoven tote bags are available in various weight options, typically expressed in grams per square meter (gsm). The weight of a nonwoven fabric used for tote bags can range from around 60 gsm (lightweight) to 120 gsm (medium-weight) or higher. Heavier weight options are generally more durable and capable of carrying heavier loads.

Thickness Options: Nonwoven tote bags can also be categorized based on their thickness. The thickness is often measured in microns (µm) or millimeters (mm). Typical thickness options for nonwoven tote bags range from 60 µm to 100 µm or more. Thicker bags tend to offer more sturdiness and resistance to wear and tear.

It’s important to note that the specific weight and thickness options may vary among manufacturers and suppliers. The intended use and desired level of durability should guide the selection of an appropriate weight or thickness for nonwoven tote bags. Additionally, factors such as the quality of the materials, construction techniques, and handling practices can also influence the overall durability of the bags.

If you have specific durability requirements or are considering nonwoven tote bags for a particular application, it’s advisable to consult with the manufacturer or supplier to determine the most suitable weight or thickness option that aligns with your needs.

How does the thermal conductivity of insulating castable affect its insulation performance?

The thermal conductivity of insulating castable plays a crucial role in determining its insulation performance.

Here’s how the thermal conductivity impacts the insulation effectiveness:

Heat Transfer Reduction: Insulating castables are designed to minimize heat transfer through the material. A low thermal conductivity means that the castable has a reduced ability to conduct heat. As a result, it acts as a thermal barrier, limiting the transfer of heat from one side of the material to the other.

Energy Efficiency: Insulating castables with low thermal conductivity help improve energy efficiency. By reducing heat loss, they contribute to maintaining a more stable and controlled temperature within the protected environment. This can result in energy savings and reduced operating costs, especially in high-temperature applications.

Temperature Gradient Reduction: Insulating castables with low thermal conductivity help in mitigating temperature gradients within the material. A high thermal conductivity can cause uneven heat distribution, leading to localized hotspots and thermal stress. By minimizing thermal conductivity, insulating castables promote more uniform temperature distribution, which enhances the material’s durability and reduces the risk of thermal cracking or spalling.

Heat Storage Capacity: Insulating castables with lower thermal conductivity typically have lower heat storage capacity. This means that they have a reduced ability to absorb and retain heat energy. As a result, they can exhibit faster heat dissipation and quicker cooling rates, which can be advantageous in certain applications where rapid temperature changes or heat cycling is a concern.

Thickness Optimization: The thermal conductivity of insulating castables influences the required thickness of the material for a given application. A lower thermal conductivity allows for thinner insulation layers to achieve the desired level of thermal protection. This can result in cost savings, reduced material volume, and easier installation.

It is important to note that while low thermal conductivity is generally desirable for insulation performance, other factors such as density, porosity, and mechanical strength should also be considered when selecting an insulating castable. The specific application requirements and operating conditions should guide the choice of insulating castable with an optimal balance of thermal properties and mechanical performance.

What are the curing and drying procedures for insulating castable after installation?

The curing and drying procedures for insulating castables after installation are essential to ensure their proper development and performance.

Here are the typical steps involved in curing and drying insulating castables:

Initial Set: After the insulating castable is installed, allow it to undergo the initial set. This is the period when the castable starts to harden but is still workable. During this time, avoid any mechanical disturbances or excessive vibration that could disrupt the castable’s integrity.

Moisture Preservation: Insulating castables require moisture to properly cure and develop their desired properties. Unshaped Refractory Materials Insulating Castable To preserve moisture, cover the castable surface with plastic sheets or use a curing compound that forms a barrier against moisture evaporation. This helps prevent premature drying and ensures a more controlled curing process.

Curing Time: The curing time for insulating castables varies depending on the specific product and ambient conditions. Typically, the castable should be allowed to cure for a minimum of 24 to 48 hours. However, it is advisable to follow the manufacturer’s recommendations for the specific castable being used.

Ambient Temperature and Humidity: Maintain suitable ambient conditions during curing to facilitate proper moisture retention and curing. The temperature and humidity levels can influence the curing process. Generally, a temperature range of 15-35°C (59-95°F) and humidity above 80% are recommended. Monitor and control these parameters as necessary.

Gradual Drying: After the curing period, the drying process can begin. Gradual drying is crucial to prevent thermal stresses, cracking, or spalling. Increase the temperature gradually to allow for the slow removal of moisture from the castable. Rapid drying, especially with direct heat application, should be avoided to prevent thermal shock.

Drying Schedule: Follow a specific drying schedule that gradually increases the temperature while maintaining a controlled rate of moisture removal. This can involve ramping up the temperature incrementally over several days or even weeks, depending on the thickness of the castable and the application requirements.

Final Drying: Continue the drying process until the insulating castable reaches its desired moisture content and achieves the desired strength. The specific moisture content and strength criteria may vary depending on the castable type and application. Consult the manufacturer’s guidelines for the recommended parameters.

It is important to note that the curing and drying procedures may vary depending on the specific insulating castable product and the manufacturer’s recommendations. Always refer to the product datasheet, technical documentation, or consult with the manufacturer to ensure proper curing and drying practices for the insulating castable being used in your specific application.

How does a pressure reducing valve work to regulate water pressure in a sprinkler system?

A pressure reducing valve (PRV) works to regulate water pressure in a sprinkler system by reducing the incoming water pressure to a lower, predetermined level.

Here’s a general overview of how a PRV operates:

Inlet and Outlet: The PRV has an inlet where the high-pressure water supply enters the valve and an outlet where the regulated, lower-pressure water exits.

Pressure Sensing: The PRV is equipped with a pressure sensing mechanism, typically a diaphragm or piston, that detects the incoming water pressure.

Adjusting Spring: The PRV includes an adjusting spring that applies force against the pressure sensing mechanism. The spring’s tension can be adjusted to set the desired outlet pressure.

Valve Mechanism: The pressure sensing mechanism is connected to a valve mechanism, which controls the flow of water through the valve based on the detected pressure. It may consist of a pilot valve or a direct-acting valve.

Pressure Balancing: When the incoming water pressure exceeds the desired outlet pressure, pressure reducing valve sprinkler system the pressure sensing mechanism detects the excess pressure. This causes the valve mechanism to open, allowing water to flow from the inlet to the outlet.

Pressure Regulation: As water flows through the valve, the valve mechanism adjusts the opening to achieve the desired outlet pressure. The pressure sensing mechanism continuously monitors the outlet pressure and adjusts the valve accordingly to maintain a consistent regulated pressure.

Pressure Relief: If the outlet pressure drops below the set value, the pressure sensing mechanism reacts by closing the valve, reducing the flow of water and preventing the pressure from falling too low.

By regulating the water pressure in a sprinkler system, a PRV ensures that the sprinklers receive a consistent and controlled water supply. This helps prevent excessive pressure that could damage the sprinkler heads or cause inefficient water distribution. Additionally, it allows for optimal performance and reliable operation of the sprinkler system.

What are the considerations for selecting and sizing a pressure reducing valve for a specific sprinkler system?

When selecting and sizing a pressure reducing valve (PRV) for a specific sprinkler system, several considerations should be taken into account.

Here are some important factors to consider:

Required Outlet Pressure: Determine the desired outlet pressure for the sprinkler system. This can vary depending on the specific sprinkler heads and their design requirements. Consult the sprinkler manufacturer’s specifications or applicable standards to identify the recommended pressure range.

Inlet Pressure Range: Assess the range of incoming water pressure that the PRV will need to handle. Measure the maximum and minimum water pressures available from the water supply source. Ensure that the selected PRV can accommodate this range while still maintaining the desired outlet pressure.

Flow Rate: Determine the expected flow rate or water demand of the sprinkler system. This is typically based on factors such as the area to be protected, the types of sprinkler heads used, and any specific fire protection requirements. Select a PRV that can handle the anticipated flow rate without causing excessive pressure loss.

Pressure Loss: Consider the pressure loss that occurs across the PRV. Pressure loss is the difference between the inlet pressure and the outlet pressure. Minimize pressure loss to ensure that the sprinkler system receives an adequate water supply and maintains the desired pressure at the sprinkler heads.

Pipe Size and System Layout: Take into account the pipe size and layout of the sprinkler system. The PRV should be sized appropriately to match the pipe diameter and flow capacity of the system. Consider any potential restrictions or pressure drops due to pipe fittings, bends, or elevation changes.

Temperature and Environment: Evaluate the temperature and environmental conditions in the vicinity of the PRV. Some PRVs have specific temperature limitations or are designed for outdoor or indoor use. Ensure that the selected PRV is suitable for the operating conditions of the sprinkler system.

Codes and Standards: Consider any applicable codes, regulations, or standards that govern the design and installation of sprinkler systems. These may include National Fire Protection Association (NFPA) standards, local building codes, or insurance requirements. Ensure that the selected PRV complies with the relevant standards and approvals.

Manufacturer Recommendations: Consult the manufacturer’s guidelines and specifications for their PRV products. They can provide valuable information on the appropriate PRV selection, sizing, and installation requirements for their specific equipment.

It is advisable to consult with a qualified fire protection engineer or a professional with experience in sprinkler system design to ensure the proper selection and sizing of the PRV based on the specific requirements of the sprinkler system.

Protect Your Baby’s Delicate Skin with the best diapers for baby girl

Protecting your baby’s delicate skin is crucial, and choosing the best diapers for baby girls can help ensure their comfort and well-being. China best diapers for baby girl manufacturers offer some factors to consider when selecting diapers for your baby girl:

Size and Fit:

Proper sizing is essential for comfort and leakage prevention. Choose diapers that are specifically designed for your baby girl’s weight and age. A snug yet comfortable fit around the waist and legs will help prevent leaks and keep your baby’s skin dry.

Absorbency:

Look for diapers with high absorbency to keep your baby’s skin dry and minimize the risk of diaper rash. Some diapers come with features like a wetness indicator that changes color when the diaper is wet, making it easier to know when it’s time for a change.

Breathability:

Opt for diapers that are breathable to allow air circulation and reduce the chances of diaper rash. Diapers with a breathable outer cover or those made from materials like cotton or bamboo can help keep your baby’s skin cool and dry.

Softness:

Choose diapers with a soft inner lining to provide a gentle and comfortable feel against your baby girl’s skin. Look for diapers made from hypoallergenic materials to minimize the risk of irritation or allergic reactions.

Wetness Protection:

Consider diapers with features that help distribute and lock away moisture, such as absorbent cores or channels. These features can help keep your baby’s skin dry and reduce the likelihood of diaper rash or discomfort.

Diaper Rash Protection:

Some diapers are specifically designed to offer extra protection against diaper rash. These diapers may have a moisture barrier or special ingredients like aloe vera or chamomile to soothe and protect your baby’s skin.

Quality and Brand Reputation:

Choose diapers from reputable brands known for their quality and commitment to baby care. Read reviews and seek recommendations from other parents to ensure you’re selecting diapers that are reliable and trusted.

Eco-Friendly Options:

If you’re environmentally conscious, consider eco-friendly diaper options. Some brands offer diapers made from sustainable materials, biodegradable components, or with reduced environmental impact.

Remember, every baby is unique, and what works well for one baby girl may not work for another. It may require some trial and error to find the best diapers that suit your baby’s needs and preferences. Pay attention to your baby’s comfort, skin health, and any signs of irritation or discomfort. If your baby experiences persistent skin issues, consult with a healthcare professional.

How can the results obtained from a flex durability test be interpreted and used in product development or quality control processes?

The results obtained from a flex durability test can provide valuable information for product development and quality control processes.

Here are some ways in which the test results can be interpreted and utilized:

Assessing Product Durability: Flex durability testing helps evaluate how a product or material performs under repeated flexing or bending. The results can indicate the product’s ability to withstand mechanical stress and predict its durability over time. This information is crucial for product development, as it helps identify potential weaknesses or design flaws that may lead to premature failure.

Comparative Analysis: Flex durability test results can be used for comparative analysis between different materials, designs, or manufacturing processes. By testing multiple samples or variations, it becomes possible to determine which option provides better durability. This allows manufacturers to make informed decisions about material selection, design modifications, or process improvements.

Quality Control: Flex durability testing serves as a quality control measure to ensure that products meet specified durability requirements. By establishing baseline performance criteria through testing, manufacturers can set quality standards and verify whether products meet those standards during production. If a product fails the flex durability test, it may indicate a manufacturing defect or non-compliance with quality requirements.

Failure Analysis: In the event of product failure or customer complaints related to durability, flex durability test results can be used for failure analysis. By examining the test data, manufacturers can identify the cause of failure, such as material fatigue, inadequate design, or improper manufacturing processes. This information helps in implementing corrective actions and improving future product iterations.

Design Improvement: Flex durability test results can guide design improvements by providing insights into weak points or stress concentrations. The data obtained from testing can help engineers refine product designs, select more durable materials, or optimize specific features to enhance overall durability. This iterative process of testing and design refinement leads to the development of more robust and long-lasting products.

Validation of Simulation Models: Flex durability testing can be used to validate simulation models or predictive tools used in the product development process. By comparing the test results with the simulated predictions, engineers can assess the accuracy and reliability of their modeling techniques. This validation ensures that the simulation models effectively capture the mechanical behavior of the product under flexing conditions.

Customer Confidence and Marketing: Demonstrating the results of flex durability testing can enhance customer confidence in the product’s quality and durability. Manufacturers can use the test data in marketing materials, product specifications, or warranty claims to highlight the product’s ability to withstand repeated use and provide long-lasting performance. This can be a valuable selling point and differentiate the product from competitors.

By interpreting and utilizing the results obtained from flex durability testing, manufacturers can make informed decisions, improve product durability, enhance quality control processes, and meet customer expectations for durable and reliable products.

What parameters or measurements can be obtained from a flex durability test?

A flex durability test can provide various parameters and measurements that help evaluate the performance and durability of a product or material.

Some common parameters obtained from a flex durability test include:

Flexing Cycles: The number of flexing cycles completed before failure or a specific performance threshold is reached. This parameter indicates the endurance or fatigue life of the product under repeated flexing.

Flexing Frequency: The rate at which the flexing cycles are applied, typically measured in cycles per minute gelbo flex test suppliers (CPM) or cycles per second (CPS). The frequency of flexing can impact the product’s durability, as different frequencies simulate different usage scenarios.

Flexing Angle: The angle through which the product is flexed during each cycle. This parameter determines the range of motion and bending stress experienced by the product. The flexing angle can be fixed or variable, depending on the testing requirements.

Force or Load: The amount of force or load applied during the flexing cycles. This parameter helps assess the product’s resistance to external forces and determines the stress levels experienced during flexing.

Deflection or Displacement: The amount of bending or deflection observed during each flexing cycle. This parameter indicates the product’s flexibility and its ability to return to its original shape after flexing.

Failure Mode: The specific type of failure observed during the flex durability test. It could be a complete fracture, visible cracks, delamination, loss of functionality, or any other form of failure. Understanding the failure mode helps identify weaknesses and potential areas for improvement.

Visual Inspection: Visual examination of the product after the flex durability test to assess any visible signs of damage, wear, or deformation. This includes checking for surface cracks, material degradation, peeling, or any other visible changes.

Electrical or Mechanical Performance: Depending on the type of product being tested, additional measurements related to electrical or mechanical performance may be obtained. For example, in the case of flexible electronic devices, parameters such as electrical conductivity, resistance, or signal integrity may be assessed.

These parameters and measurements are used collectively to evaluate the durability, performance, and integrity of the product under repeated flexing conditions. They help in understanding the product’s behavior, identifying potential failure modes, and making informed decisions regarding design improvements, material selection, and quality control processes.

How does a sanitary napkin making machine work? Can you explain the process?

The process of how a sanitary napkin making machine works typically involves the following steps:

Raw Material Preparation: The machine requires various raw materials, such as fluff pulp, superabsorbent polymers (SAP), non-woven fabric, and release paper. These materials are prepared and fed into the machine.

Core Formation: The fluff pulp and SAP are mixed together to form the absorbent core of the sanitary napkin. This mixture is then compressed and shaped into a thin, rectangular layer.

Non-Woven Fabric Application: The machine unwinds a roll of non-woven fabric, which serves as the top layer of the sanitary napkin. The absorbent core is placed on the non-woven fabric, and the machine cuts and attaches the fabric to the core.

Backsheet Application: A layer of impermeable material, often a polyethylene film, is fed into the machine and attached to the backside of the sanitary napkin. This layer prevents leakage and provides a barrier between the napkin and clothing.

Wing Formation (if applicable): For sanitary napkins with wings, the machine cuts and attaches additional layers of non-woven fabric or film to create the wings that fold over the sides of the underwear for better protection.

Folding and Shaping: The machine folds and shapes the sanitary napkin into its final form, ensuring proper alignment and smooth edges.

Individual Packaging: The finished sanitary napkins are often individually wrapped in plastic film or sealed in packaging material to ensure hygiene and convenience for users.

Quality Control: Throughout the process, the machine incorporates quality control measures, such as sensors and optical systems, to detect and reject any defective or substandard products.

Stacking and Counting: The machine stacks the packaged sanitary napkins and counts them to facilitate packaging and distribution.

Output and Conveyor: The finished sanitary napkins are then discharged from the machine onto a conveyor belt or collection area, ready for further packaging or distribution.

It’s important to note that the specific process and features of a sanitary napkin making machine may vary depending on the manufacturer and machine model. The above steps provide a general overview of the typical operations involved in the production of sanitary napkins using such a machine.

How can the quality and efficiency of sanitary napkins produced by the machine be ensured?

Ensuring the quality and efficiency of sanitary napkins produced by a machine involves several key measures.

Here are some ways to achieve this:

Regular Maintenance: Regular maintenance and servicing of the machine are essential to keep it in optimal working condition. This includes checking and replacing worn-out parts, lubricating moving components, and addressing any issues promptly. Following the manufacturer’s recommended maintenance schedule is crucial to ensure consistent performance and minimize downtime.

Quality Control Checks: Implementing quality control checks at various stages of the production process is important. This can involve using sensors, cameras, or other inspection systems to detect defects or deviations from quality standards. These checks may include monitoring the dimensions, weight, absorbency, and overall integrity of the napkins.

Raw Material Control: Ensuring the quality of raw materials used in the production process is vital. Strict quality control measures should be in place to verify the specifications and consistency of the fluff pulp, SAP, non-woven fabric, release paper, and other materials. This can involve working closely with trusted suppliers and conducting regular material testing and analysis.

Operator Training: Proper training of machine operators is crucial for maintaining quality and efficiency. Operators should be familiar with the machine’s features, sanitary napkin making machine operating procedures, and troubleshooting techniques. Training should also cover quality control measures, such as identifying defects, adjusting machine settings, and adhering to production standards.

Process Optimization: Continuously optimizing the production process can improve efficiency and quality. This involves analyzing the machine’s performance, identifying bottlenecks or areas of improvement, and implementing changes to enhance productivity and reduce waste. Process optimization may include adjusting machine settings, fine-tuning production parameters, or exploring innovative techniques.

Statistical Process Control: Implementing statistical process control techniques can help monitor and control the quality of the napkins. This involves collecting and analyzing data at various stages of production to identify trends, detect variations, and take corrective actions. Statistical process control enables proactive quality management and assists in maintaining consistent product quality.

Feedback and Evaluation: Encouraging feedback from end-users or conducting periodic evaluations can provide valuable insights into the quality and performance of the sanitary napkins. Customer feedback can help identify areas for improvement and address any issues promptly. This feedback loop ensures continuous quality enhancement based on user experiences.

Compliance with Standards: Following applicable industry standards and regulations is crucial for ensuring the quality and safety of sanitary napkins. Adhering to standards related to absorbency, leakage protection, hygiene, and material safety helps maintain product quality and consumer trust.

By implementing a combination of these measures, manufacturers can enhance the quality and efficiency of sanitary napkins produced by the machine. Continuous monitoring, process optimization, and a focus on quality control contribute to consistently producing high-quality products that meet customer expectations.

Are there any special care instructions for grey knit throw blanket?

Here are some typical care instructions for grey knit throw blanket:

Cleaning:

Machine wash cold, gentle cycle with like colors. Use mild detergent.

Tumble dry low or lay flat to air dry. Do not iron.

Shedding:

New blankets may shed loose fibers for the first few washes. This is normal. Brushing with a lint remover can help control shedding.

Pilling:

Pilling (small balls of fiber) may develop over time, especially in high-traffic areas. To minimize, store folded or on a soft surface when not in use.

Bleaching:

Grey knits are usually dyed all the way through so bleaching isn’t necessary. Avoid chlorine bleach which can degrade fibers over time.

Moth Protection:

Store in a plastic bag or cedar chest to protect from moths if storing long-term. Moths are attracted to natural wool/cotton fibers.

Fabric Refreshing:

Lay flat in sunlight for an hour to freshen fibers. Air fluff before refolding or putting back on the couch.

Proper gentle cleaning and avoidance of heat sources will help grey knits maintain their color and texture longevity.

What are some common applications for Heavy duty staples?

Here are some common applications that utilize heavy duty staples:

Framing/construction

For securing plywood, OSB, boards during framing of floors, walls, roofs, etc.

Deck building

Fastening deck boards, railings, and accessories made of wood or composite materials.

Fencing installation

Securing chain link or rigid vinyl/wood fencing to posts.

Insulation/sheathing

Stapling vapor/air barriers, house wraps, insulation to surfaces.

Roofing/siding

Attaching asphalt shingles, metal/composite roofing/siding, underlayment.

Cabinetry/trim work

Assembling cabinets, molding, wainscoting in home/commercial projects.

Pneumatic hose construction

Fastening reinforced hose layers during manufacturing.

Automotive/upholstery

Upholstery work on seats, headliners, door panels in vehicles.

Packing crates/pallets

Constructing shipping containers for durable product transport.

Furniture assembly

Joinery tasks like attaching legs,stretchers, splats, stretchers.

Heavy duty coil/braded staples are well-suited for industrial/construction uses requiring strength and longevity.

What are the advantages of using resilient seals in double flange butterfly valves?


Using resilient seals in double flange butterfly valves offers several advantages for their operation and performance.

Here are some key advantages of resilient seals:

Excellent Sealing Performance: Resilient seals, such as those made of materials like EPDM (Ethylene Propylene Diene Monomer) or Nitrile, provide excellent sealing performance. They can effectively prevent leakage across the valve seat, ensuring a tight seal even under varying pressures and temperatures.

Wide Compatibility: Resilient seals are compatible with a wide range of fluids, including water, air, gases, and certain chemicals. They are suitable for various applications in industries such as water treatment, HVAC systems, and general process industries.

Flexibility: Resilient seals have inherent flexibility, allowing them to conform to the irregularities and imperfections of the valve seat and pipe surfaces. This flexibility ensures a reliable and tight seal, even in applications where slight misalignment or distortion may occur.

Resilience to Contaminants: Resilient seals have good resistance to contaminants such as dirt, dust, and debris that may be present in the pipeline. They can maintain their sealing properties and prevent leakage, even in environments with moderate levels of particulate matter.

Chemical Resistance: Resilient seals are designed to withstand exposure to various chemicals and fluids commonly encountered in industrial applications. EPDM, for example, offers excellent resistance to water, acids, alkalis, and many chemicals, making it suitable for a wide range of applications.

Low Operating Torque: Resilient seals typically require lower operating torque compared to other sealing materials, such as metal seals. This lower torque requirement allows for easier actuation and operation of the valve, reducing the strain on the actuator and providing smoother control.

Long Service Life: Resilient seals are known for their durability and long service life. They can withstand repeated cycles of opening and closing without significant degradation, ensuring reliable performance over an extended period. Proper maintenance and periodic inspection can further enhance their longevity.

Cost-Effective: Resilient seals are generally more cost-effective compared to metal seals, making them a preferred choice in many applications. They offer a balance between performance, durability, and cost, making them an economical option for various industries.

It’s important to consider the specific application requirements, including the fluid type, temperature range, and chemical compatibility, when selecting the type of resilient seal for a double flange butterfly valve. Manufacturers and suppliers can provide guidance on choosing the appropriate resilient seal material based on your specific application needs.

What are some common maintenance practices for ensuring the longevity of resilient seals in double flange butterfly valves?

To ensure the longevity and optimal performance of resilient seals in double flange butterfly valves, regular maintenance practices are essential.

Here are some common maintenance practices to consider:

Regular Inspection: Conduct routine inspections of the valves to check for any signs of wear, damage, or degradation of the resilient seals. Inspect the seals for cracks, tears, swelling,double flange butterfly valve or signs of chemical attack. Pay attention to the condition of the sealing surface and ensure it is clean and free from debris or contaminants.

Cleaning: Keep the valve and sealing surfaces clean to prevent the accumulation of dirt, debris, or other contaminants that could affect the performance of the resilient seals. Use appropriate cleaning methods and solutions, taking care not to damage or compromise the integrity of the seals.

Lubrication: Some resilient seals may benefit from periodic lubrication to maintain their flexibility and sealing properties. Consult the manufacturer’s recommendations to determine if lubrication is necessary and the appropriate lubricant to use. Avoid using incompatible lubricants that could degrade or damage the seals.

Actuator Maintenance: If the double flange butterfly valve is equipped with an actuator, ensure proper maintenance of the actuator components. Regularly inspect and service the actuator to ensure smooth operation and prevent excessive stress or strain on the resilient seals.

Replacement: Over time, resilient seals may wear out or become damaged beyond repair. It is important to have a proactive replacement strategy in place. Monitor the performance of the seals and replace them as recommended by the manufacturer or when signs of deterioration are observed during inspections.

Proper Installation: Ensure that the double flange butterfly valve is installed correctly according to the manufacturer’s instructions. Improper installation can lead to misalignment or excessive stress on the resilient seals, affecting their performance and longevity.

Temperature and Chemical Considerations: Consider the temperature and chemical compatibility of the resilient seals when selecting the valve and during operation. High temperatures or exposure to incompatible chemicals can accelerate the degradation of the seals. Take necessary precautions and consult the manufacturer’s guidelines.

Training and Documentation: Ensure that personnel responsible for valve maintenance are trained on proper maintenance procedures and follow documented maintenance guidelines. Keep records of maintenance activities, inspections, and seal replacements for reference and future maintenance planning.

It is important to consult the specific maintenance recommendations provided by the valve manufacturer for the double flange butterfly valve and the resilient seals used. Following the manufacturer’s guidelines and industry best practices will help ensure the longevity and reliable performance of the resilient seals in the valve.